Drawing a Treble Clef
Home » Read Piano Notes » How to Draw a Treble Clef
Knowing what the clef is for will help you to achieve better results when you try to draw it.
The clef is stated to help you to orient yourself on the staff. We'll use the clef when we wish to read or draw notes above middle C.
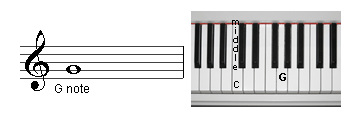
 If you'll have a look at the shape of the clef you might realize that its belly is shaped like the letter G.
Now here's how to draw the treble clef in a few simple steps:
 1. Get a paper with a staff on it (You can click here to find a free printable blank piano sheet).
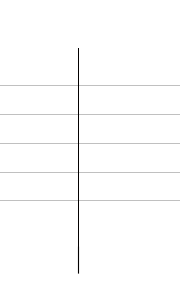
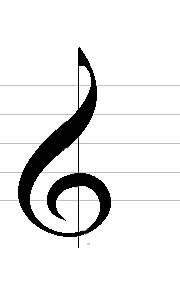
A Vertical Line - Now draw a vertical line in the left side of the staff where the treble clef is usually located. Make sure the vertical line is longer then the staff, hanging on both ends.
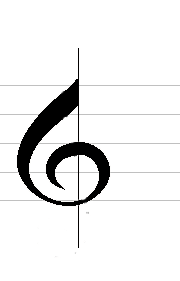 2. The G Letter - What we're gonna do next is draw the letter G starting from the
second line. Notice how I set the boundaries of belly to the third line and the bottom line.
2. The G Letter - What we're gonna do next is draw the letter G starting from the
second line. Notice how I set the boundaries of belly to the third line and the bottom line.
Realize that you shouldn't make the belly too wide. It takes some practice.
I continue to curve the line until I reach the end of the letter in the fifth line.
What I'm basically doing is creating a spiral or as some people see it, I draw the number 6.
 3. Semi Circle - Now I will move to the other side of the horizontal line and curve the line in a semi circle to the edge of the vertical line.
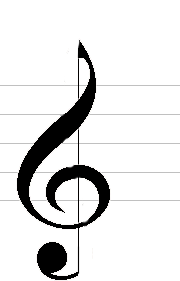 4. Curved Tail - All I have to do now is add a little curved tail at the bottom
of the vertical line.
4. Curved Tail - All I have to do now is add a little curved tail at the bottom
of the vertical line.
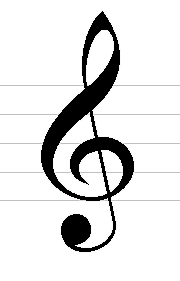 and Walla, here you go! a beautiful treble clef.
Tips:
1. The clef could be drawn in a few ways. You could start from the tail for example.
The reason I chose to draw it this way is because the vertical line will guarantee that your clef will be in proportions.
Then you'll draw the G letter which keeps you aware of the essence of the clef.
2. The tail is just a common decoration. You could skip it if you're not into tails.
3. When I draw the Clef I usually start from the second line, I draw the spiral and curving at the top then I go down all the way to the tail.
By drawing the clef this way I save some time since I don't have to leave the pen or pencil from the paper. I just draw it smoothly in one time.
4. The clef is originally named the G clef. That's because you can actually set it in different places on the staff and it will tell you that G above middle C should be played.
When the clef is located on the second line we name it treble clef (which is what you're going to see happening in music almost always).
5. As you might have noticed the vertical line in the final drawing is slanted a bit. This is the
most common way to draw the clef. So if you're secure about the proportios of the clef you could slant your line as well.
Exercise
Fill one or two lines on an empty staff of the clef until you feel that you can draw it smoothly in the right proportions.
 If you want to learn more about reading piano notes you should definately check out the Rocket Piano Ultimate Learning kit. Rocket Piano provides
an amazingly handy and effecive piano course on various issues such as reading piano notes, playing piano by chords, piano technique and more.
If you want to learn more about reading piano notes you should definately check out the Rocket Piano Ultimate Learning kit. Rocket Piano provides
an amazingly handy and effecive piano course on various issues such as reading piano notes, playing piano by chords, piano technique and more.
You're going to love the way they work systemically with the help of their useful audio and video files that are short and to the point. By working
with Rocket Piano you basically guarantee that you'll become pro at reading piano notes (And the big bonus is you'll learn to play piano by ear as well).
Check out the Ultimate Piano Learning Kit of Rocket Piano Now!